| |
|
| Step 3: Arrange |  |
|


|
|
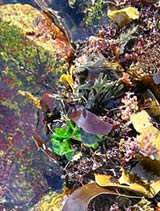 | Use different approaches for filamentous, membranous, and coarse specimens
A few different approaches can be used when pressing different kinds of seaweeds. For this purpose, we divide seaweeds into four types: filamentous (having fine branches that clump together when out of water); membranous (very thin, limp, sheet-like specimens); coarse (composed of relatively thick branches or blades); and crustose and coralline (flat crusts on rocks or other algae, and coarse seaweeds reinforced with calcium carbonate [limestone]). The instructions in the rest of this guide focus on filamentous specimens, but can be used to press membranous and coarse species as well. If you are pressing coarse specimens, some alternative and simpler techniques can be used. Coarse specimens can be arranged outside of water: evenly dampen a sheet of mounting paper with a wet sponge or spray bottle, place your specimen on the damp paper, arrange, and then assemble into your press (skipping the use of a pressing tray altogether). In addition, some coarse specimens can be rinsed in tapwater before arranging, which helps to speed their drying and prevent salt from accumulating on them. It's not advised to rinse filamentous or membranous specimens, because many leach their pigments in tapwater. If your specimen has very thick parts (particularly holdfasts in kelps), air-bladders, or receptacles, trim them with a sharp knife before you begin arranging. Be aware that coarse specimens take a relatively long time to dry, and many don't stick well to paper. Crustose and coralline species are usually dried without pressing. |
Prepare your pressing tray and workspace, and mark your paper
Pour clean seawater into your pressing tray (to about 1/4-inch [6-mm] depth), and make certain that you have blotting paper or newsprint arranged on a table nearby. Optionally, place a flat mesh rack at the bottom of the tray to help remove your mounting paper later on. As you go, mark each sheet of mounting paper in pencil in a corner with identifying notes (the name of your specimen if it's been identified, the date and place it was collected, and your name or any other important information). Marking the paper before you begin will help you to keep track of your specimens when they go into the press, and you won't be able to write on your mounting paper after the next step when it gets wet. These identifying notes will eventually be transferred to a label for your finished specimen. If you are working in a group or with seaweeds collected from different locations, keeping records is especially important. | 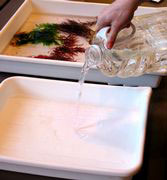 |
 | Wet your mounting paper and adjust the height of seawater in your pressing tray
Thoroughly wet your mounting paper by sliding the paper into your pressing tray, tipping the tray around to slosh seawater over the top of the paper, then turning the paper over so that the soaked side is facing up. It can take a minute or so for some mounting papers to wet. Push the wetted paper down so that it is under (not floating on top of) the seawater, and then adjust the height of the seawater so that it just barely covers the paper. To lower the height of the seawater, carefully pour some off or siphon some out with a baster. Water that is too low makes it difficult to spread out the branches of fine specimens, while water that is too high makes it difficult to control the arrangement of specimens, especially when you eventually remove the paper from your tray. |
Place your specimen on the wetted paper in your pressing tray
Carefully place your cleaned specimen in the center of your wetted mounting paper. Seaweeds with fine branches are typically reduced to a single clump when taken out of water (the reason for working in seawater in the first place). However, if you carefully lift your specimen and drape it onto the mounting paper (instead of dropping it down), you might be able to prevent it from becoming excessively tangled in itself. | 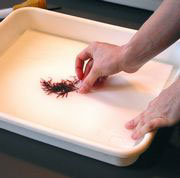 |
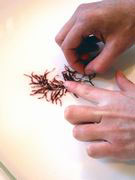 | Unfold and arrange the main branches of your specimen and trim as needed
To begin arranging, try to untangle and spread out all the main branches of your specimen. This can be challenging with some fine filamentous seaweeds, but it is relatively simple to unfold coarse or membranous species. Next, arrange the main branches to create the overall composition. In this process, let yourself be guided by the natural branching pattern of your specimen. If the branches are so crowded that they will obscure each other when pressed flat, now is the time to do some judicious trimming. Try to trim branches at their bases (flush to the branch that bore them) by pinching them off with a fingernail, but be careful not to stain or scar your mounting paper during this process. If your specimen is very large, you might need to fold or curve parts of it to fit onto the mounting paper, or get a bigger press! |
Arrange the fine branches of your specimen
Spread out and arrange fine branches with the aid of seawater and small paintbrushes or pins. You can add extra seawater in small amounts from a fingertip, baster, or squirt bottle. Some special attention must be given to make certain that fine branches do not end up as an indistinguishable clump after pressing. Fine branches are most easily spread out when they are nearly totally immersed in seawater; however, too much water will make it difficult to control their position. At this stage (or any time), you may want to adjust the height of seawater in your pressing tray to give yourself more or less control in spreading out fine branches. | 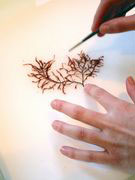 |
|
|
|