| |
|
| Step 5: Assemble |  |
|


|
 | Place your specimen/mounting paper on scrap blotter and cover with cheesecloth, waxed paper, or mesh fabric
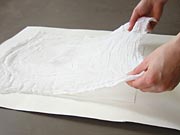
Place your specimen/mounting paper on a sheet of scrap blotter or newsprint, and cover your specimen with a covering sheet of cheesecloth, waxed paper, or a mesh fabric such as a nylon stocking or nappy/diaper liner. This covering sheet will prevent your specimen from sticking to the blotter or newsprint that is used to dry it in the press. Try not to reposition this covering sheet once it is on top of your specimen, as that might disturb your arrangement. Cheesecloth works well as a covering sheet for most seaweeds, but waxed paper is recommended for wiry filamentous species, which tend to get caught in open-mesh fabrics. |
Blot excess water with scrap blotting paper or clean newsprint
If you are using an absorbent or open-mesh covering sheet (basically, anything other than waxed paper), place a sheet of scrap blotter or newsprint over the covering sheet, and gently press down to blot off excess water. As with other steps, take care not to disturb your specimen. If water from your specimen soaks through the scrap blotter, reposition the blotter so that a dry area covers your specimen and blot again until no water soaks through. You will find that some species hold a large amount of water, and you may completely soak several sheets of scrap blotter in an afternoon. This step greatly speeds up the drying process in the assembled press (so you'll actually need less blotter in the end) and helps to reduce salt deposits on finished specimens.Skip this step, however, if you are using waxed paper as a covering sheet. | 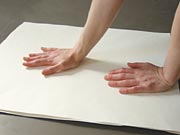 |
 | Begin assembling your press
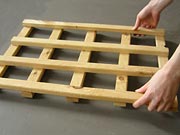
Begin assembling your press by placing one frame of your plant press (or a stiff board of some kind) in a convenient spot where it can remain as you continue to work. If you have a plant press with cross-lattice frames, you should be aware that there is a 'right side' and a 'wrong side' to each half. Although not critical, it is best if the side having longer cross-braces faces into the press. This means that the frame you place on the bottom should have the long cross-braces facing up, and the other frame you eventually place on the top should have the long cross-braces facing down. This orientation will be perpendicular to the fluting (corrugation) in the cardboard ventilators in your press, and thus helps to distribute pressure more evenly and to extend the life of your ventilators. This orientation will also make it easier to use straps or clamps to compress your press in the next step. |
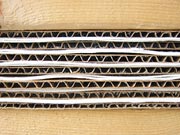
Sandwich your mounting paper/specimen/covering sheet between sheets of blotter and cardboard
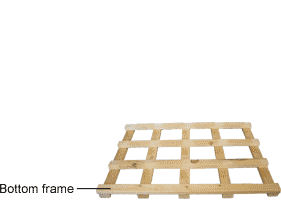
The diagram to the right shows all the components in an assembled press. On top of the bottom frame of your press, assemble the basic 'sandwich' of the plant press: cardboard > blotter > mounting paper > specimen > covering sheet (cheesecloth) > blotter > cardboard. First place a cardboard ventilator on top of the bottom frame, then cover this with a sheet of blotter or several layers of clean newsprint. Next, place your arranged specimen (on its mounting paper and still covered with its covering sheet) on top of the blotter. It's helpful to slide a scrap sheet of cardboard underneath your mounting paper/specimen/covering sheet in order to move these together as a group. If your mounting paper and specimens are relatively small, you may be able fit more than one specimen on the blotter, but be certain not to overlap the sheets of mounting paper, and try not place very thick and thin specimens together in the same level. To complete the basic sandwich, place a sheet of blotter on top of the mounting paper/specimen/covering sheet(s), and top off with another cardboard ventilator. As you go along, try to keep all of these components centered over the bottom frame.
|  |
 | Continue loading your press with arranged specimens
As you prepare more specimens, simply continue stacking up the press in the same order by placing a sheet of blotter on top of the top sheet of cardboard, then adding the next specimen (on mounting paper with a covering sheet), then blotter, then cardboard, and so on. As you continue working, it's a good idea to keep a little weight on top of the press to keep everything flat and in position. The top frame of your press and a book or two are adequate for this purpose. When you have loaded in your last specimens, confirm that the contents of your press are in order. If your press has sheets of cardboard or blotter that are far out of alignment, don't try to square them up as you would an uneven deck of cards. Instead, leave them as they are (unless they will interfere with clamps or straps you might later use to bind your press), or carefully disassemble the press layer by layer and realign the sheets as you restack the press. If you forcibly shift the position of any sheets in an assembled press, you will probably disturb some of your specimens. |
Finish assembling your press
After you've loaded your last specimen into the press, gather any wet blotter or newsprint from your workspace and load this into the press on top of your specimens, separating the sheets of wet blotter with more cardboard ventilators. Because you are about to dry the contents of the press, this is a good place to dry your blotter as well, and the pressure in the press keeps the blotting paper from buckling as it dries. There is no set limit to the number of specimens you can stack in one press (except the length of your straps or width of your clamps, if you are using these in the next step), but presses loaded with more than a foot (30 cm) of material become very heavy and unstable. The assembly of your press is completed simply by adding the top frame (or another stiff board), oriented with the long cross-braces facing down, if applicable. | 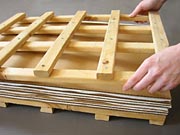 |
|
|
|