| |
|
| Step 4: Clean |  |
|


|
|
 | Carefully lift your specimen and mounting paper out of the pressing tray
After you have arranged your specimen, you must remove it from your pressing tray by slowly sliding it out on your mounting paper. First, be certain that the level of water in the tray is not too high: there should be little or no water pooled on top of the paper. If there is too much water, remove some from the tray with a baster, siphon, or sponge. Next, firmly grasp an edge of your mounting paper and slowly pull the sheet out of the tray on an angle as shown in the photo. It's sometimes helpful to pull the paper out on a very low angle so that it drags over and is stabilized by the edge of the tray. If your specimen is shifting as you remove it, you can try to brace its main branches in place with the fingers of one hand as you pull out the paper with your other hand. You can also try to slowly tip your tray to drain all the water off of your mounting paper before removing it. A mesh rack, placed underneath your mounting paper before you begin, can make this step a lot easier by providing a rigid support for the paper. |
Let your mounting paper briefly drip dry...
Holding your paper on an angle with two hands, pause for a moment to let excess water drip off and back into your tray. Water tension will help secure your specimen to the paper, but watch it carefully and don't hold it at too steep an angle. You can control the angle of your paper by cupping it slightly and resting the lowest corner on the lip of the tray. If you're working with a thin or very large sheet of mounting paper or a relatively coarse specimen, this step will be difficult, and should probably be skipped. | 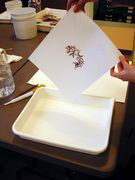 |
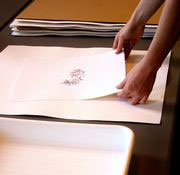 | ...and lay it on top of scrap blotting paper or clean newsprint
Place your mounting paper directly onto a scrap piece of blotter or newsprint. The blotter will help to remove more water and will secure your mounting paper as you inspect, adjust, and clean your specimen in the next step. |
Inspect and clean your specimen and mounting paper
This is your last opportunity to clean any debris off of your work and a chance to make very small adjustments to the arrangement of fine specimens. A wet piece of cheesecloth or the tip of a small paintbrush wetted in seawater can be used to dab off stray fibers, sand, and anything else that has found its way onto your paper. If you are concerned about the cleanliness of your finished specimen, you will now begin to appreciate the importance of always having clean seawater and a dust-free workspace. At this point, you can also try to spread out any fine branches that clumped together when you removed your specimen from your tray. Use a small paintbrush to place a large drop of seawater on top of the branches you want to spread. The drop of water itself will spread out most fine branches, but if you are daring, you might try to spread the branches further with the tip of your brush. Do not try to move any branches that offer resistance to a gentle nudge, or you'll end up clumping them together even more. If you spend more than a minute or two at this stage, be certain that no part of your paper or specimen becomes completely dry. Membranous algae, like Ulva, dry out quickly, but can be kept moist with an occasional mist of water from a spray bottle. | 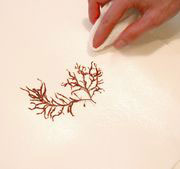 |
|
|
|