| |
|
| Step 7: Finish |  |
|


|
 | When the press is completely dry, unload it and carefully uncover your pressed specimens
When you are certain that the contents of your press are dry, unstack it from top to bottom. If you've been using a fan, make certain that it is off so that you don't blow away your work. As you go along, carefully remove the cheesecloth or other covering sheet from each specimen by peeling it off slowly from one edge. Take extra care near the edges of fine filamentous specimens, which sometimes tear or pull off the mounting paper. The edges of filamentous specimens are less likely to be damaged if you peel off the covering sheet from the center out, generally following the branches of the specimen from coarse to fine. |
Inspect and tape or glue down sections of your specimens as needed
Inspect your specimens carefully, and secure any sections that are not well adhered to the mounting paper with herbarium tape or glue. Use narrow strips of herbarium tape in different locations to strap the specimen to the page, or gently lift up loose sections and apply small dabs of thick glue underneath to secure them in place. Professionals use conservation glues, like PVA and wheat paste (sometimes called botany paste), but common white glue (casein glue) will suffice if conservation glue is not available. Be certain to let the glue dry thoroughly before you stack up your specimens again. A few species don't stick well and might need to be taped or glued down entirely, but most seaweeds will stick to the mounting paper on their own. They stick because they contain natural adhesive substances, some of which (carageenan, agar, and alginate) are commercially extracted for use in familiar products (for example, carageenan in ice cream and toothpaste). | 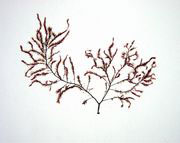 |
 | Label your specimens
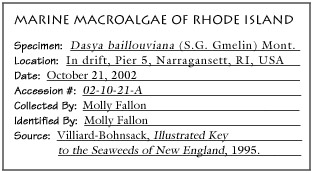
Label each specimen with whatever information you think is important, but be sure to include the location and date it was collected, the name of the person who collected it, and, if you have identified it, its scientific name (Latin binomial) and the name of the book you used to identify it. Ideally, you should include reference information about the location (such as longitude and latitude, a GPS reading, or grid reference), a detailed description of the collection site and habitat, and the authority for the scientific name (the initials or abbreviated name of the scientist[s] responsible for first documenting the organism, often found after the scientific name). If your specimen was treated with Formalin or another fixative, this should also be mentioned. You can write this information directly on your mounting paper in archival ink (such as India ink), but it's often easier to write or type it on a separate label and glue that label onto your mounting paper. This information adds scientific value to your work, because scientists compare labeled herbarium specimens to learn about organisms and environments and how they change. For instance, comparing your specimen to others collected from the same location in the past (and eventually in the future) may help scientists understand how the local environment changes over time. Ideally, labels should be made of archival paper (100%-rag) and affixed with a clear-drying archival glue, such as PVA. |
Store, trade, or display your specimens
In scientific collections, specimens on standard-sized herbarium sheets are grouped into card-stock folders and stored in the dark in herbarium cabinets. Beautiful specimens have been preserved for hundreds of years under these conditions; however, not too many people get a chance to see them. Consider trading your specimens with professionals and enthusiasts from other areas. Trading specimens is common among professional herbaria, and helps to create collections with representative specimens from around the world. Professionals will expect that specimens be mounted on standard-sized herbarium sheets (11½ × 16½ inches [29 × 42 cm]), and labeled with accurate details about the collection site and conditions. You can also mount seaweeds less formally on note cards or in albums, a practice that was popular among Victorian ladies. Although seaweeds are pressed to preserve them, many pressed specimens are still fragile and most will fade if displayed for any length of time. Exposure to bright light or sunlight especially makes the colors in seaweeds fade. You can try to stabilize your specimens by coating them in clear acrylic or varnish, or by trying to laminate them in plastic, but these techniques can be tricky and yield only mixed results. If you do want to display your work, keep in mind that it will fade, and use this as an excuse to press some more! To preserve our original seaweed art, we have to work under strictly controlled conditions and employ a variety of proprietary techniques and treatments. Even if your work is stored in a folder on a shelf, you can still bring it out to show your friends, and its fugitive nature can make it an even more cherished treasure. | 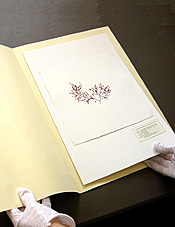 |
|
|
|